
メーリングリストを実施するサービスは多くあるが、ここではGoogleAppsを利用したメーリングリストの構築手順を図解する。
GoogleAppsを勧める理由は独自ドメインが使えること。また、既にGoogleAppsを独自ドメインで運用しているならグループを作成するだけですぐにメーリングリストを開始することができる。これにより、仕事などの場合では外部の無料サービスを使うより信頼感が生まれる場合もある。
スポンサードリンク
◆グループを作成する
▲ドメインの管理→ユーザーとグループ→新しいグループを作成

▲必要な事項を入力して「新しいグループを作成」をクリック
◆メンバーを追加する

▲メンバー(メールアドレス)を追加する。GoogleAppsの管理下である必要はなく、外部のアドレスでも良い。
◆テストしてみる

▲メンバーに設定したアドレスから、作成したグループアドレス(メーリングリスト)に送信する

▲メンバーそれぞれが受信した
◆メンバー以外からも送信を受け付ける
未登録のメンバーからメールを受信するとエラーになる:
Hello ****@***.ne.jp,
We’re writing to let you know that the group you tried to contact (ml) may not exist, or you may not have permission to post messages to the group. A few more details on why you weren’t able to post:
* You might have spelled or formatted the group name incorrectly.
* The owner of the group may have removed this group.
* You may need to join the group before receiving permission to post.
* This group may not be open to posting.If you have questions related to this or any other Google Group, visit the Help Center at http://www.google.com/support/a/****.jp/bin/static.py?hl=en_US&page=groups.cs.
Thanks,
****.jp admins

▲設定を「公開」にすれば、誰でも送信できるようになる
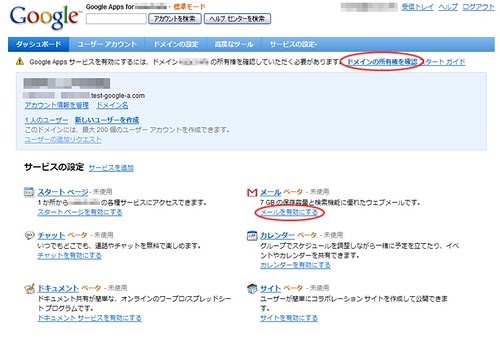
※注意:これらの操作は、ドメインの所有権が確認された後でなければ操作できない
参考文献
- Google Apps でメーリングリストの作成 | すぐに忘れる脳みそのためのメモ :
 Google Apps でメーリングリストの作成プログラミングや、便利なアプリケーションの設定、生活用品に関するブロクです。jutememo.blogspot.com
 - GoogleAppsでメーリングリストを利用する際の注意点|Materializing [マテリアライジング] :
GoogleAppsでメーリングリストを利用する際の注意点|Materializing [マテリアライジング]GoogleAppsのGmail機能では、メーリングリストの自由な運用が出来ます。 簡単便利ではあるのですが、メールが届かなかったり、ユーザーの扱いで不都合が出たりする場合もなきにしもあらずです。 ■Google Apps ヘルプグループ ...www.materializing.net - ITmedia Biz.ID:システム管理者に頼らなくても使えるお勧めメーリングリストサービス :
 システム管理者に頼らなくても使えるお勧めメーリングリストサービスメーリングリストが有効だと感じても、実際の運用にはサーバや運営管理者が必要で、小規模な組織では実施しにくいかもしれません。メンバーが頻繁に変更になるようなプロジェクトやグループでは、そのつど管理者に設定を依頼するのも面倒です。そこで、今回は...www.itmedia.co.jp
 - グループとメーリングリストの新機能 – Google Apps ヘルプ :
http://www.google.com/support/a/bin/answer.py?hl=jp&answer=126169


コメント